
Intro to Recycling Clay

You can recycle clay, or reclaim clay, so it can be used again. Many potters keep their non contaminated (21) clay scraps from trimming, broken greenware, or old throwing slurry (3) to recycle and reuse. As long as clay has not been fired it can be recycled (10, 21). It can be a time consuming process (2), physically demanding and take up a lot of space (14) but it doesn’t have to be an unreasonable amount of work (3). Plus, recycled clay is clay that you don’t have to buy! As the old saying goes, there are about as many ways to recycle clay as there are potters. Many variations are presented below. Find the process that suits your situation the best. Of course, if you have access to a pugmill, it can be used to easily recycle clay. (20).
Safety
The most notable hazard to be conscience of when you recycle clay is breathing clay dust from dry clay (11). To be safe, wear a good quality respirator mask and eye protection (14). Also be careful when lifting large amounts of clay to be sure not to strain any part of your body.
Materials and Equipment

- Clay (of course!)
- Clean Water
- Buckets/Plastic Containers
- Dust Mask/Respirator
- Plaster Slab
- Bisque Slabs and Canvas
- Electric Drill
- Vinegar, Bleach, etc.
- Plastic Bags/Sheets
- Mallet/Hammer
- Mixing Devices (stick, jiffy mixer, etc.)
- Screen
- Pillow Cases or Sheets
- Turkey Baster
- Hose
- Sponges
- Stilts
- Scooping and Scraping Utensils
Instructions for How to Recycle Clay
Dry the Clay Completely (optional)
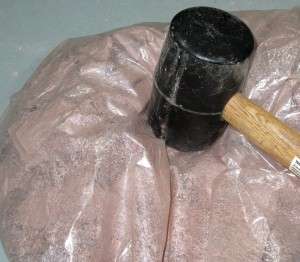
Many people suggest it is easier to recycle clay if it is completely dry (7, 9, 11, 12, 13, 14) because it will slake or break down in the water faster and more evenly (5, 6, 8, 17, 25, 26, 27). Dry clay can even be broken or crushed into small bits to speed water absorption (5, 6, 12, 14, 15, 17, 18, 22, 27). Be careful to avoid dust and break up pieces outside or in a well ventilated area (13). You can reduce dust by breaking dry clay with a mallet while it is inside thick plastic bags (14).
Other people say that it’s fine to submerge clay in water when it is still wet (4, 5, 10, 15). The water will eventually break it down no matter how wet or dry it is. But it will take longer if it is still leather hard than it will if it is dried completely (9, 11). Some suggest that very wet clay, like throwing slop, or bone dry clay can be used but not the in between, leather hard clay (24).
If you use more than one type of clay make sure that you keep them separate from each other (22) to prevent losing the properties that you like about each one (18). For example if you have a white clay and you want it to stay white, use different containers than you use when you recycle clay that is darker(18).
Add Clay to Water

Some say that adding the clay to water is ideal (13). To make sure the clay absorbs enough water it can be added in 5 lb. increments every 15 minutes (14). But dumping dry clay into water can cause clay dust to become airborne. Do this in a well ventilated area, wear a mask (7), and be sure to avoid breathing the dust.
Water can be poured over the clay instead (2) or clay can be added to water while the clay is still wet (5). For example you might add trimmings to a bucket filled with water after each trimming session. Make sure all clay is completely covered with water. If you pass moist clay through a screen before it goes in the water it can break up large chunks and catch any tools or other debris that have been lost in the clay (5). Some people like to use a pillow case or sheet as a liner inside the bucket. It makes getting the clay out of the bucket easier (2). You could also put wet clay in a pillowcase and hang it up to drip dry (10). Or bone dry clay in a pillowcase can be dipped in water (3) before being hung up.
Let the Clay Slake/Absorb Water
As the clay sits in the water it will slake, or break down as it absorbs water. If you let your clay dry completely before adding it to the water you might only have to let it sit for a few hours (7), overnight (5, 8) or up to a few days (6, 12, 14). If the clay begins to stink there are a few things you can do. Suggestions include stirring the clay every so often (5, 16), adding a small amount of bleach (5, 16), dish soap (5), vinegar (5), clove oil (5), pinesol (5), etc. Some people discourage the use of bleach and other chemicals because the smell comes from bacteria in the clay which improve plasticity. So it’s better to let them continue to work (5). Some potters add a little vinegar to improve plasticity (5, 8, 22).
Mix the Clay (optional)

Mixing the clay is optional. Some people just wait until the water breaks the clay all the way down and move on to the next step (5, 11). Other people say that it’s better to mix the clay after/as it is broken down in the water (6, 12, 22, 24). This can create a more uniform mixture without hard or soft spots. To mix the clay you can use anything from a stick (19) to an electric drill with a mixing attachment (7, 15, 24) such as a jiffy mixer (6). If you have lumps you can also add a little water or mix small amounts with a hand blender (24). To keep clay from flying all over, you can use a bucket with a hole cut in the lid to put the mixer through (20). After mixing, the clay can be passed through a screen into another bucket to take out any tools or other debris (20). Let it sit for another day (12) to a month (20) to help even out the consistency and let water rise to the top.
Remove Excess Water
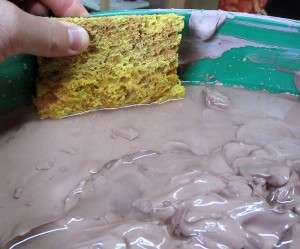
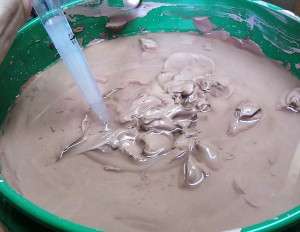
Water can be poured, sucked (5), skimmed (8) or sponged (5) off the top. You can use a turkey baster or bulb syringe to suck up excess water (5) or siphon off water with a hose (5) but try not to disturb the clay (12, 15).
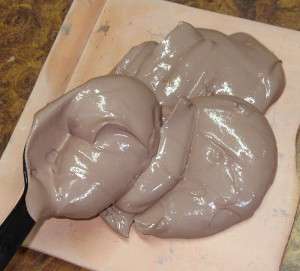
If your wet clay is in a pillowcase or other fabric it can be hung up to let the excess water drip out (3). Water can also be removed from the clay by putting it in a colander lined with newspaper (3). If you mix the clay into a very smooth, pudding-like mixture, you may not see excess water right away and can move onto the next step.
Let the Clay Dry
If you’ve followed the above steps, your clay will most likely be too wet to use for most purposes and will need to be dried to the proper consistency. This can be accomplished a number of ways. One popular way is to spread it out on an absorbent surface to reduce drying time. Make a layer 2 inches (5) to 4 inches (12) thick on plaster slabs (8, 12), bisque fired clay (1, 5, 15), cloth covered concrete (5) or ground (15), a plaster bat (4, 7, 13, 22), slate table (6), wedging table, sheet-rock (5), HardiBacker Board (5), terracotta flower pot (15), wood (17), a framed window screen with canvas on top (14), old towels (18) etc.
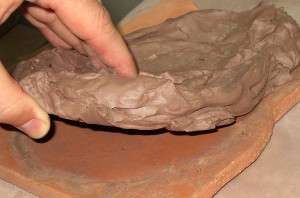
The clay can be flipped over when it pulls away from the surface easily (5, 7, 13, 24, 26) to allow uniform drying.
The time it takes for the clay to dry depends on the thickness of the clay, how much water is in the clay, the humidity (8), the type of drying surface, and the temperature (1). It might take as little as a few hours (1) to a few days (5, 8).

To dry the clay faster it can be put on a wire rack (11, 24) or stilts (1) to let air circulate underneath, a fan can be used (11, 27) or it can be put outside in the warm sun (1, 13). If drying clay outside, cover it with a breathable fabric to prevent unwanted materials from getting stuck to the clay (5). Sometimes the edges of the clay dry faster than the middle so you can make the edges thicker (1) or just push the drier edges into the middle as it dries (15, 26).

Clay that is just a little too moist for your intended purpose can be formed into a coil with the ends on a table and the middle curved up into the air to allow quicker drying (3, 10, 11). It is also possible to let the clay dry in a 5 gallon bucket. Line the bucket with plastic and poke 1.5″ wide holes in the clay daily to let it dry (23). If your clay is hanging inside a fabric bag or pillowcase let it continue to dry until the indentation from a finger poke stays indented (5).
Prepare the Clay for Use
The clay is ready whenever it has dried to the proper consistency for what you want to use it for. So if it can be wedged without sliding all over the wedging table it is probably right for most work (12). Learn about wedging clay. If your clay is drying on plaster be careful not to get any pieces of plaster in the clay! (11, 16, 27) because it will ruin your work when it is fired in the kiln (5, 8). You can cut the clay up into small chunks for wedging (7), run it through the pugmill (10), or let it sit for a while (5) if it is inside airtight plastic (11). Air can move slowly through most plastics so you can also put clay wrapped in plastic into an airtight container (18).
Thanks for Reading!
If you have any other tips you use to recycle clay and would like to share, add a comment below or contact me and I’ll add your tip.
You can support this site by purchasing some of the materials to recycle clay with the links below:
Some of the links below are affiliate links. If you make a purchase by clicking on one of the links, I get a small percent of the sale with no extra cost to you.


References
- http://www.artbyfuzzy.com/blog/2012/07/16/clay-studio-notes-july-2012/
- http://artmind-etcetera.blogspot.com/2012/01/how-to-recycle-clay.html
- http://www.bigceramicstore.com/information/tip10.htm
- http://blackmtnbarb.blogspot.com/2012/07/mud.html
- http://ceramicartsdaily.org/ceramic-supplies/pottery-clay/recycling-clay-tips-for-collecting-storing-reclaiming-and-reprocessing-your-clay-scraps/
- http://ceramicartsdaily.org/community/topic/776-recycling-clay/page__s__bfb5a04e99d87c4ef01aef2dee65b3fa
- http://ceramicstoday.com/howto/htrecycle.htm
- http://claydancerpottery.blogspot.com/2009/07/processing-reclaim-clay.html
- http://www.ehow.com/video_4946363_recycling-scrap-pottery-clay.html
- http://elmostreport.blogspot.com/2008/01/recycling-clay.html
- http://www.goshen.edu/art/DeptPgs/rework.html
- http://joshheimpottery.com/blog/reclaiming-clay/
- http://miyceramics.com/blog/2010/reclaiming-clay/
- http://www.mnclay.com/technical/feature_tech_recycle.html
- http://www.potters.org/subject07431.htm
- http://www.potters.org/subject69060.htm
- http://www.potters.org/subject82188.htm
- http://pottery.about.com/od/diyclaybodies/ss/recycle.htm
- http://www.pottery-magic.com/pottery/clay/clay_recycling.htm
- http://www.ricks-bricks.com/Minerecycle.htm
- http://www.squidoo.com/clayprep
- http://thejustworkblog.blogspot.com/2011/05/recycling-clay.html
- http://www.wikihow.com/Recycle-Ceramic-Clay-Using-the-Bucket-Method
- http://www.youtube.com/watch?v=XKui_DVUzXA
- http://www.youtube.com/watch?v=s15yn8uY_Lk
- http://www.youtube.com/watch?v=4xLiJxSGCwI
- http://www.youtube.com/watch?v=Q2L4ob_XXxQ
I have some slops that I mixed and put through a 120 seive then added black sand. Wanted to make a big plaster mould, but putting on any of the many surfaces you have suggested with be far easier!
It has been in a chilli bin for about a month and is probably going to take another 3 to come close to usable!
Might try the pillow case 🙂
Printable Version???????
I like that you mentioned that the most notable hazard with recycling clay is breathing in the dust. I think that if you are breathing in the dust then you have a higher chance of getting a lung problem. I think that if I was recycling a lot of clay then I might want to wear a mask.